
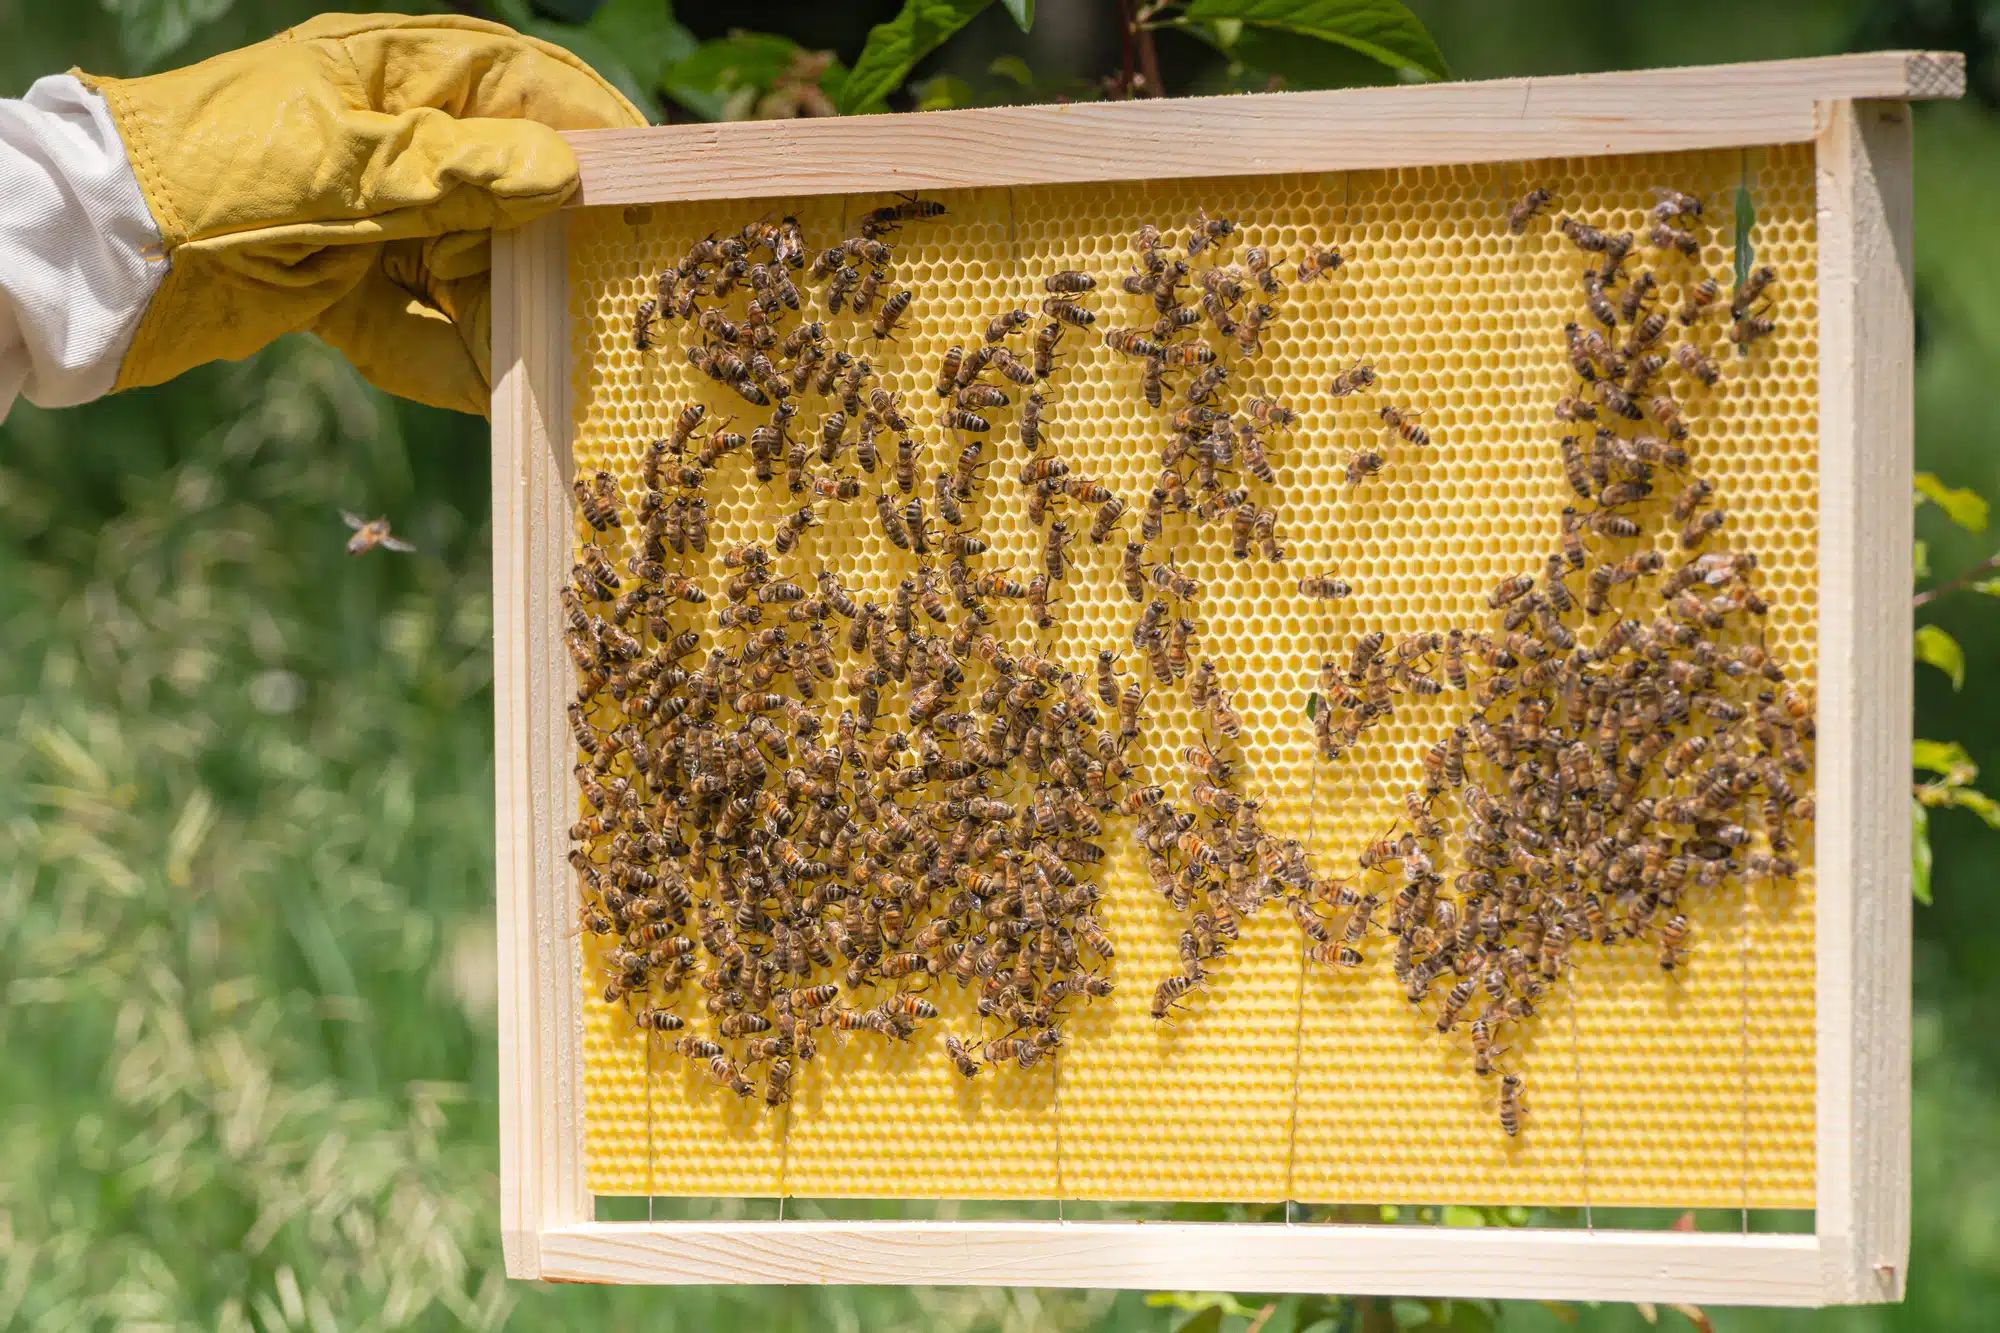
How do you fit wax foundation into a frame? By embedding the wire into the sheet, not simply laying it on top. Wire the frame with approximately 0.55 mm frame wire, tension it until it rings when plucked, place the foundation on a flat support board, then heat the wire with a spur embedder or electric embedder just enough for it to sink into the wax. Too little and it lifts away; too much and the wire cuts through the sheet.
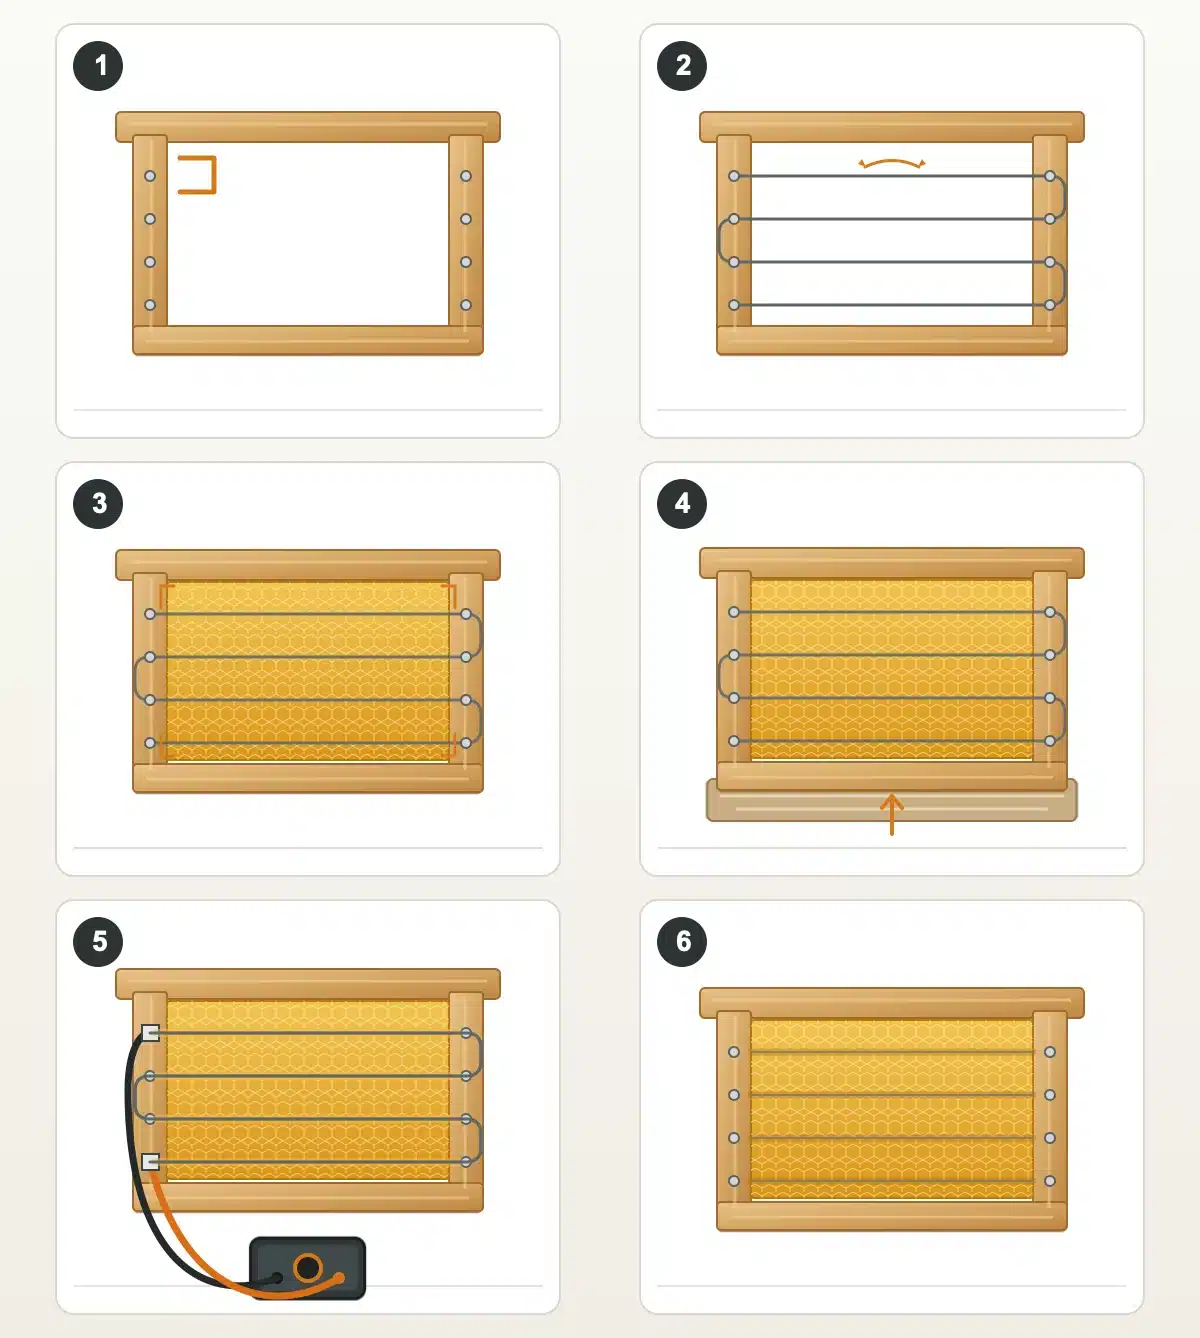
The result depends on three things, none of them being the particular tool you use: a straight, correctly tensioned frame; a flat sheet that is not compressed inside the frame; and wire that is properly embedded. This guide starts with ready-made foundation. To make sheets from molten wax, see our guide to rolling and embossing beeswax.
The process in six steps
- Check that the frame is square, clean and free from cracks.
- Wire and tension it: the wire should yield slightly, then spring back.
- Offer up the foundation and trim it to the actual frame, not the nominal dimensions.
- Place the assembly on a support board that keeps the wax flat.
- Embed the wire with a spur embedder or an electric system.
- Allow it to cool and inspect both sides before storing the frame.
What you need: essentials and optional tools
You do not need every tool at once. The principle is always the same; only the tool used to embed the wire changes.
- Essential: a straight frame, a correctly sized sheet of wax foundation, frame wire and a smooth support board.
- Depending on the frame: eyelets, a retaining wedge or a thin bead of wax to secure the top edge.
- Choose one method: a manual spur embedder for a few frames; an electric spur embedder or embedding transformer for batch work.
- Optional but useful: a wire tensioner or zigzag wire crimper for restoring tension in reused frames.
If you are starting from scratch, the tools are grouped by purpose under frame wiring and waxing. Choose a system that suits your workload and wire material; there is no need to duplicate tools.
1. Prepare and wire the frame
Set the frame on a flat surface. If one corner lifts, the side bars have bowed or a joint has opened, correct it first. Foundation will not straighten a distorted frame: it copies the defect and transfers it to the comb.
Horizontal or vertical frame wiring
Horizontal wiring runs through both side bars. It is the usual arrangement on frames drilled for that route, can be tensioned from one end and forms a continuous circuit, so all wires can be embedded in one pass with a transformer.
Vertical wiring runs between the top bar and bottom bar. It is used on frames designed for that arrangement. The choice is not arbitrary: it is determined by the frame design and the embedding equipment you have.
On Langstroth and Dadant brood frames, the common arrangement is four horizontal wires. On deeper formats, follow the holes provided in the frame. Adding wires without a reason does not necessarily strengthen it; it creates more work and can bow the side bars during tensioning.
Which wire to use and how much you will need
Use purpose-made frame wire, either galvanised or stainless steel, that fits the holes and eyelets. The wire we supply is 0.55 mm in diameter, and a 1 kg spool contains approximately 535 metres. In real frame numbers, that means:
| Frame format | Frames per 1 kg spool |
|---|---|
| Layens | ≈ 275 |
| Langstroth | ≈ 334 |
| Dadant (brood frame) | ≈ 254 |
| Shallow super | ≈ 340 |
Indicative yields calculated using four wire runs per frame and a small handling allowance. If your frame uses five wires, you leave long tails or follow a different route, the spool will cover fewer frames.
It is the calculation most people skip, and the one that prevents a job stopping halfway through on a Sunday: one spool is more than enough to wire several complete hives.
Metal eyelets prevent the wire from sawing into the wood, sinking into the hole and losing tension. In soft timber and frames reused over multiple seasons, they are not an optional extra: they are what keeps the wire tensioned from one year to the next.
Different types of wire tensioner make it easier to tension the wire without fighting the ends, including geared pliers and handled models. A zigzag wire crimper puts a slight wave into the wire. That wave acts as a spring, accommodates expansion and lets you restore tension without releasing the wire. It is especially useful on previous-season frames that have gone slack. You will find these tools under frame wiring and waxing.
How to check wire tension
- Press the centre: the wire should yield slightly and return to position.
- Pluck it with a fingernail: a clear note indicates tension; a dull thud points to slack wire.
- Watch the side bars: if they bow inwards, the wire is over-tensioned.
- Inspect the holes: if the wire is cutting into the timber, fit or replace the eyelets.
Slack wire does not support the foundation while the bees draw it and does not reinforce the comb during extraction. The problem appears later as bowed foundation, wavy comb or an area lifting away from the plane of the frame.
2. Fit the foundation sheet
Only take out the sheets you are ready to fit. Wax foundation changes stiffness markedly with temperature: when cold it cracks; when warm it sags under its own weight.
On a plain sheet with no hooks or reinforcement, orientation is determined by how it fits the frame. If it has built-in vertical wires, top hooks or a retaining wedge, that construction takes precedence over any general rule.
- At the top: seat it in the groove, beneath the retaining wedge or against the top bar, depending on the frame.
- At the sides: it should occupy almost all the usable width, so the bees can join the comb to the side bars, but it must not be forced in.
- At the bottom: follow the groove or split bottom bar. If there is no lower fixing, leave a small clearance rather than forcing the wax against the timber.
Secure the top edge: the fault that appears in July
A sheet can be perfectly embedded onto the wire and still pull away from the top bar in midsummer, when heat and the weight of clustered bees act together. The wire supports the centre; the top bar supports the upper edge, and that is where it can come loose.
If the frame has a retaining wedge, nail it over the seated foundation; that is its purpose. If it does not, or you want extra security, seal the top edge with a thin bead of molten wax where the foundation meets the top bar. This is not a blob of wax, but a fine line that joins both parts and spreads the load along the full edge.
There is no universal clearance. Measure the actual frame, not its nominal size. If the sheet is too short it loses support at the edges; if it is compressed, it will buckle as soon as the temperature rises.
3. Use a support board
Place the frame on a smooth board that fits inside it and supports the foundation from beneath. This stops the wax sinking as the spur embedder passes over it and lets you control how deeply the wire enters the sheet.
Keep the surface clean and free from splinters. If the foundation sticks, dampen the board very lightly without leaving pooled water. The board keeps the wax in one plane; it does not press it against the frame.
If you use an electric embedder, any moisture must remain confined to the board: the transformer, connectors and your hands must stay dry. Do not spray water on the frame once the equipment is connected.
4. Embed the wire in the wax: four methods
- Manual spur embedder: for a few frames and repairs. It requires pressure and can crack a cold sheet.
- Heated manual spur embedder: for a few frames and firm wax. If it is too hot, it cuts through and drags the wax.
- Electric spur embedder: for a small or medium workshop. It requires a steady pace: too fast and the wire stays on the surface; too slow and it cuts the sheet.
- Embedding transformer: for medium and large batches. It requires a continuous circuit and even wire tension.
Manual spur embedder, cold or heated
A spur embedder guides the wire in a grooved wheel and presses it into the foundation. Used cold, it works when the wax is flexible and properly supported. If the tool is heated in hot water and dried first, the wax closes around the wire. Do not heat it in a flame: it overheats quickly and cuts through the sheet.
Electric spur embedder
An electric spur embedder keeps the wheel hot and avoids pauses for reheating. It suits small and medium workshops, but it requires a steady pace: moving too quickly leaves the wire on the surface; moving too slowly cuts the wax.
Electric embedding transformer
This system heats the wire itself by passing current through it. It is fast and repeatable when the circuit is continuous, the wire tension even and the foundation properly supported. It is the practical method once you begin preparing frames in batches.
There are 9 V units, such as this wax embedder transformer, and 24 V/100 VA models, such as this 24 V electric embedder. Voltage alone does not determine suitability: the combination of voltage and wire material does. Galvanised wire conducts well; stainless-steel wire has considerably greater electrical resistance. This produces four combinations, only two of which are comfortable to work with:
- Galvanised wire + 9/12 V: ample power; this is the natural pairing.
- Galvanised wire + 24 V/100 VA: heats very quickly; use very short pulses or it will cut through the foundation.
- Stainless-steel wire + 9/12 V: may take too long to heat and tempt you to overload the equipment or the frame.
- Stainless-steel wire + 24 V/100 VA: the extra power makes useful, repeatable heating easier.
This also explains a common contradiction on forums: some people insist stainless steel heats faster, while others say it takes longer. Both observations can be true, but they refer to different wire-transformer combinations. A reliable way to cut foundation is to apply 24 V to galvanised wire for the same duration used with a 9 V unit.
Work in pulses, never continuously: a small transformer is not designed to run for hours without a break. Always test the first frame when you change the wire material, diameter or frame format, and do not automatically carry the same heating time from one arrangement to another.
Improvised alternatives: why they often cause problems
Battery chargers, car batteries and repurposed transformers can supply poorly matched current: sometimes the wire does not heat; sometimes it cuts through the wax instantly. Never connect the wire directly to mains electricity. For consistent work, use equipment with a suitable output and insulated connections.
5. Electric wire embedding, step by step
- Position the support board and place the frame on top.
- Offer up the foundation, secure its top edge and check that it lies flat.
- Identify the beginning and end of the continuous wire circuit.
- Place the contacts on those two ends, without touching the wire with your hands.
- Remove them as soon as the wire begins to disappear into the foundation.
- Allow it to cool for a few seconds, then inspect both sides.
The wire must be embedded in the wax: neither resting on the surface nor cutting right through. If one section is not secure, correct it locally with the spur embedder. Reapplying current to the entire circuit overheats the areas that were already correct and is the most common way to damage a nearly finished sheet.
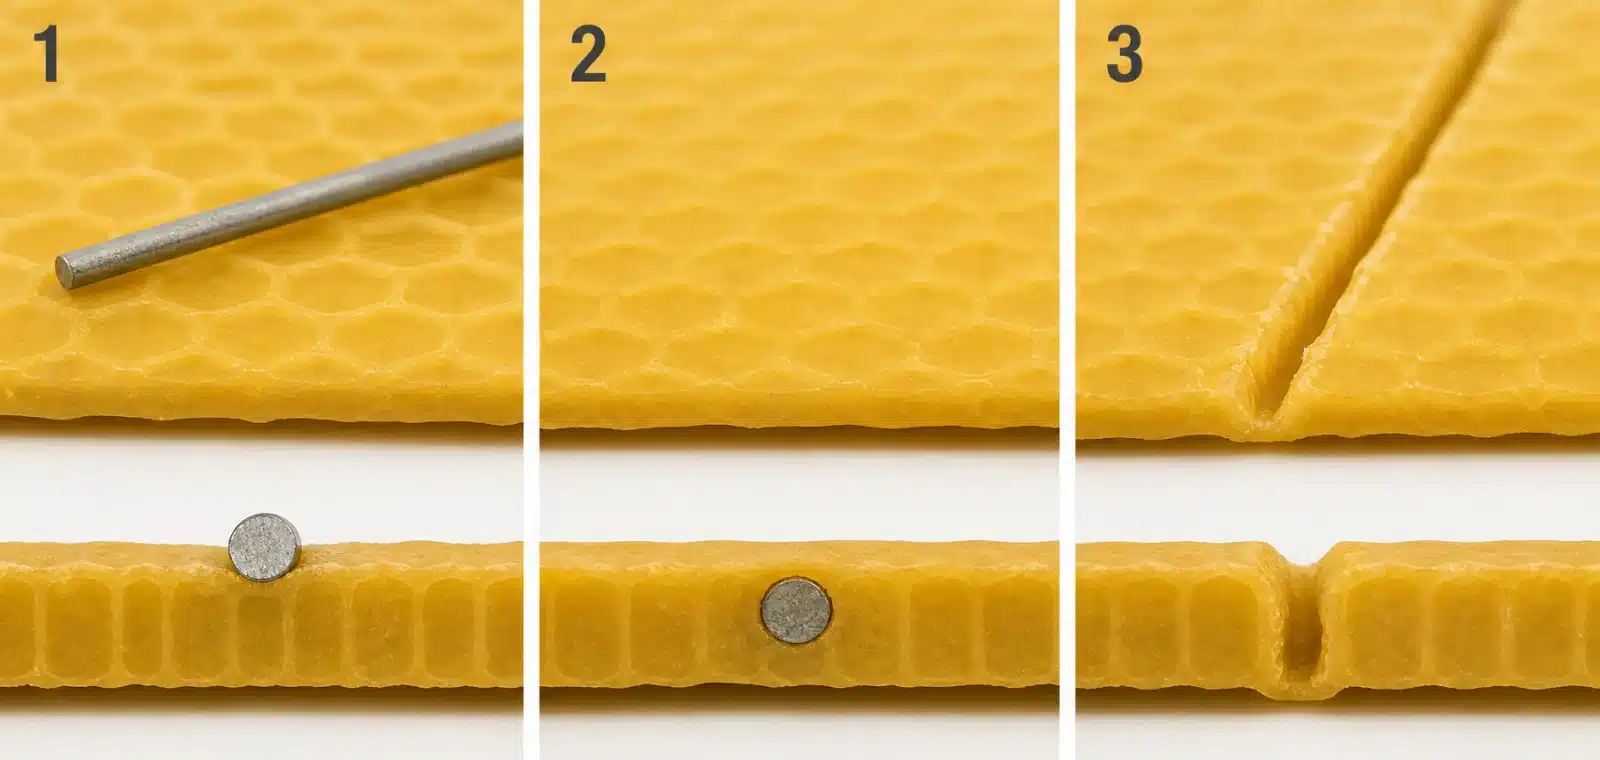
6. Adjust for frame format and season
On deep frames, such as Layens or Dadant brood frames, poor tension or support affects a larger area and becomes obvious sooner. On a shallow super frame, the electrical path is shorter and may heat at a different rate. Always test the first frame when changing format, wire diameter or batch of foundation.
Workshop temperature matters more than it may seem. Cold conditions make the sheet brittle enough to split during handling; heat makes it sag and buckle inside the frame. During winter, let the sheets acclimatise indoors before fitting them. In summer, work in the shade, take out only a few sheets at a time and never leave them in a vehicle or direct sunlight.
Workshop diagnosis: identify the problem immediately
This diagnosis is made at the bench: what you can see, the likely cause and how to correct it without damaging the frame.
The wire does not sink in and remains on the surface
- Likely cause: insufficient heat or poor contact.
- What to do: lengthen the pulse slightly; if the problem persists, clean the contact points.
The wire cuts through the sheet immediately
- Likely cause: excessive power for that wire; this is common with galvanised wire at 24 V.
- What to do: shorten the pulses substantially. A cut sheet can be remelted; do not attempt to patch it.
Some sections embed and others do not
- Likely cause: uneven wire tension or a sheet that is not supported across the whole board.
- What to do: restore the wire tension, check that the sheet rests on the board throughout and correct poorly embedded sections locally with the spur embedder.
The transformer does not heat the wire
- Likely cause: an open circuit: a loose end, a contact placed on the timber instead of the wire, or a section that does not complete the circuit.
- What to do: check both ends and make sure each clip touches metal; if you have a multimeter, test continuity before applying another pulse.
The foundation bows while heat is applied
- Likely cause: the sheet was compressed against the frame.
- What to do: remove it, trim it to the actual width and offer it up again. Heat will not correct this fit.
The wax cracks under the spur embedder
- Likely cause: the sheet is too cold.
- What to do: let it acclimatise in the workshop for a while before continuing.
Common mistakes and how they appear later
| Mistake | How it appears in the hive |
|---|---|
| Slack wire | Bowed foundation, wavy comb, displaced areas |
| Over-tensioned wire | Bowed side bars, scored timber, loss of tension after a few weeks |
| Insufficient embedding | Wire remains visible, lifts away and does not reinforce the comb |
| Excess heat | A cut line or small openings in the foundation |
| Compressed sheet | Ripples as soon as the wax warms |
| Sheet too short | Comb poorly joined to the side bars and less rigid during extraction |
| Assembly out of plane | Bees draw one face more than the other and alter the space between combs |
One final warning prevents many disappointments: do not confuse a fitting fault with poor timing when the frame is introduced. A weak colony or one without a nectar flow may chew or poorly draw a correctly fitted sheet. New foundation is used best when the colony is growing and has the resources to draw comb. If you are considering avoiding foundation altogether, our comparison of plastic frames and wax foundation sets out both options side by side.
Store frames already fitted with foundation
- Store them vertically in brood boxes or supers, with no weight resting on the foundation.
- Choose a cool, dry place away from direct sunlight.
- Keep them away from fuels, pesticides, solvents and strong odours: wax retains fat-soluble contaminants.
- Protect them from dust, knocks and rodents.
- Before use, recheck the wire tension and that the foundation is flat.
As explained in our article on wax moth, the main risk concerns drawn comb, especially dark brood comb. New foundation does not need complete darkness; preventing heat, distortion and contamination matters most.
Final check
- The frame is square and sits steadily on a flat surface.
- The wires are taut without bowing the side bars.
- The foundation is centred, flat and properly secured at the top.
- It occupies almost the full width without being compressed.
- The wires are embedded continuously and evenly throughout the sheet.
- There are no cuts, cracks, scorched areas or lifted edges.
A well-fitted frame should do more than look tidy on the bench. The foundation must reach the hive flat, allow the bees to draw even comb and then withstand both handling and extraction.

Frequently asked questions
How many wires should a hive frame have?
On Langstroth and Dadant brood frames, the common arrangement is four horizontal wires. On deeper formats, follow the holes provided in the frame. Adding extra wires does not necessarily make it stronger and can bow the side bars during tensioning.
Can wax foundation be fitted without an electric embedder?
Yes. A manual spur embedder, used cold or heated in hot water, secures the sheet effectively and is the sensible choice for a few frames or repairs. An electric embedder is faster and more repeatable when preparing batches.
Why does wax foundation buckle?
Usually for one of two reasons: the sheet was compressed inside the frame and bows as it warms, or the wire is too slack to support it. It also happens when the frame was distorted before the foundation was fitted, because the wax reproduces that defect.
When should frames of wax foundation be given to the bees?
When the colony is growing and a nectar flow is under way, because it then has the resources to draw the wax. A weak colony or one without incoming nectar may chew or poorly draw a correctly fitted sheet; that does not necessarily indicate a fitting fault.

ISNI 0000 0005 1801 1100 | Joshua Ivars is the manager of LA TIENDA DEL APICULTOR and the author of this blog, where he shares technical and practical guidance for beekeepers. Drawing on extensive experience in the beekeeping sector, he offers advice and solutions based on beekeepers’ real needs, sharing his knowledge of equipment and essential beekeeping practices.


